Hornbill User Guide
DISCLAIMER
This user guide is provided by Phibonacci Creativo Sdn. Bhd. for informational and instructional purposes only. It is intended to assist users in utilizing the associated product or service effectively. While every effort has been made to ensure the accuracy and completeness of the information contained in this guide, Phibonacci Creativo Sdn. Bhd. makes no representations or warranties, express or implied, regarding its accuracy, reliability, or suitability for any specific purpose.
Phibonacci Creativo Sdn. Bhd. shall not be held liable for any errors, omissions, or misinterpretations of the content or for any actions taken based on the information provided herein. Use of this guide is at your own risk.
This guide is protected under copyright law and may not be reproduced, distributed, or disclosed without the prior written consent of Phibonacci Creativo Sdn. Bhd., except for personal or internal organizational use.
By accessing or using this guide, you agree to these terms. If you have any questions or require further assistance, please contact our Technical Support.
Get started
Integrate with LHDN E-Invoice API
To submit e-invoices and allow customers to request e-invoices, you must authorize Phibonacci Creativo to submit e-invoices to the LHDN API on your behalf.
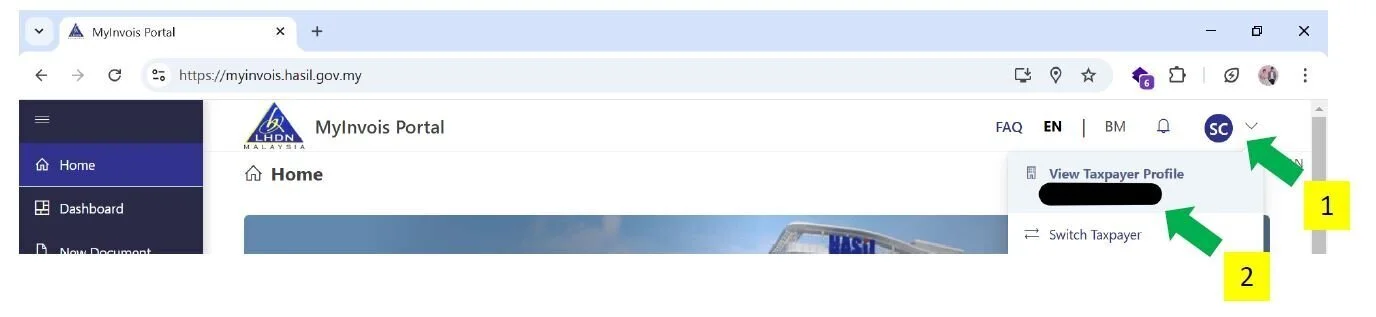
- Open https://myinvois.hasil.gov.my/ using Google Chrome, and login accordingly.
- Click "MyInvois" on the Top Menu.

- Click the user profile icon on the top right of the screen, then click the "View Taxpayer Profile"
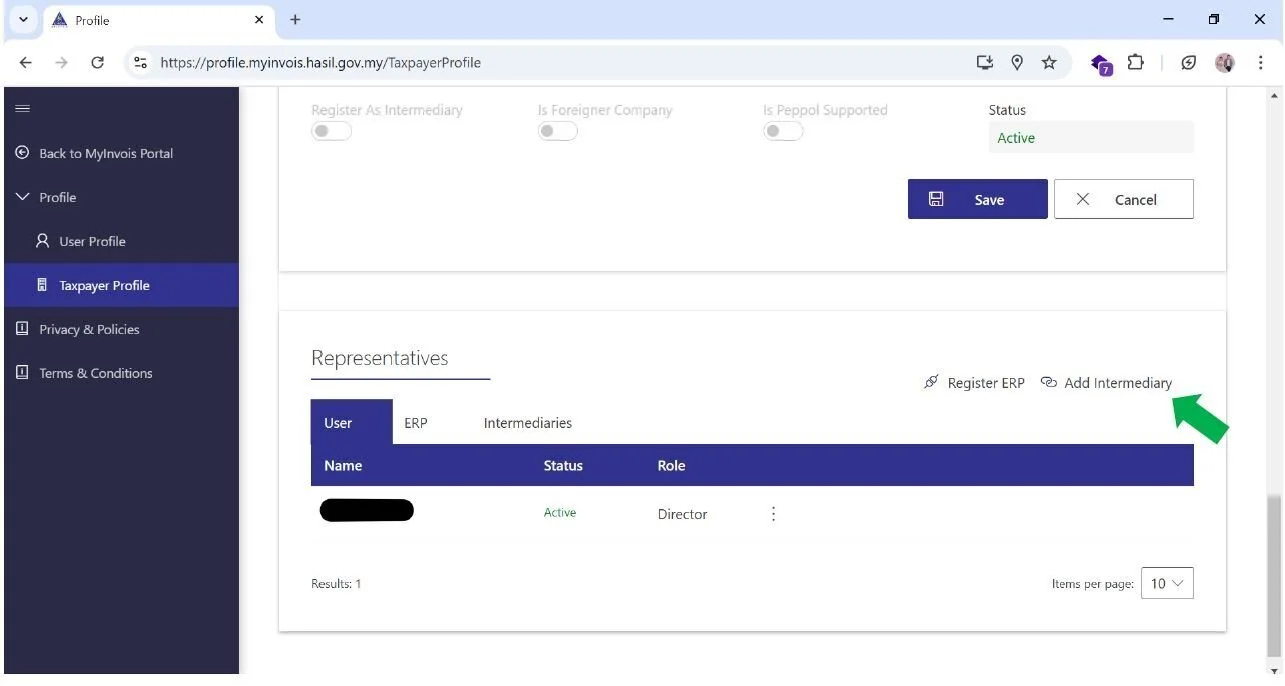
- On the "Taxpayer Profile" page, scroll to the bottom of the page, click "Add Intermediary"
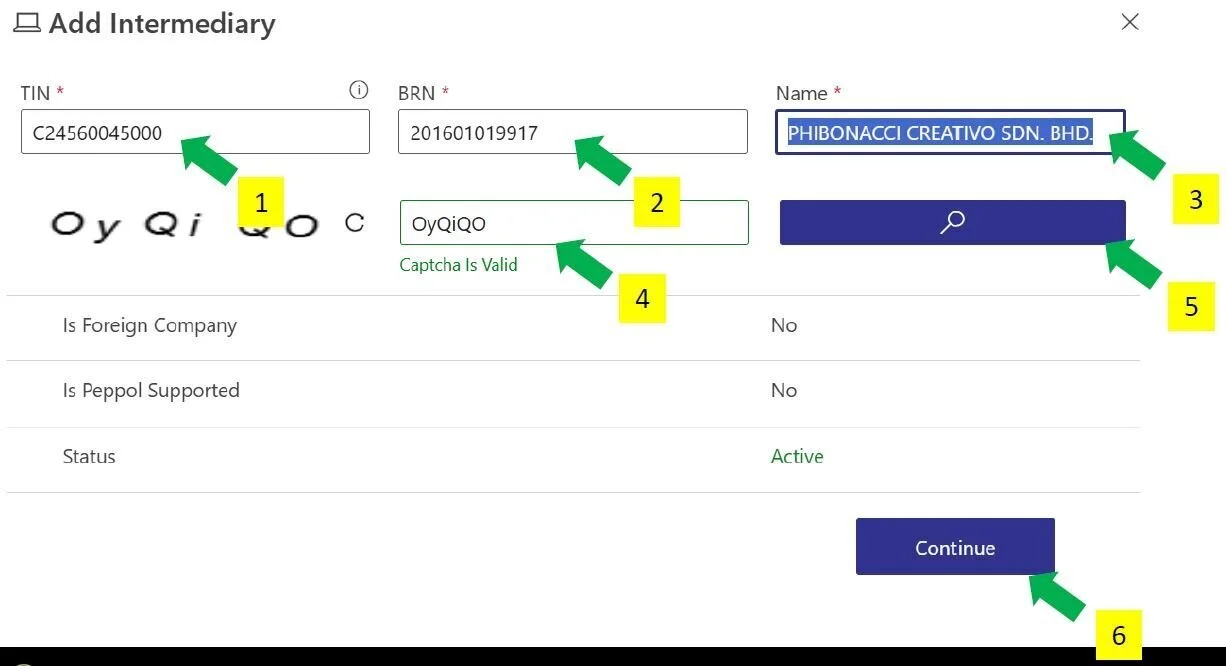
- Add Phibonacci Creativo as intermediary with the following information. Company name must be in all capital letter with full stops.
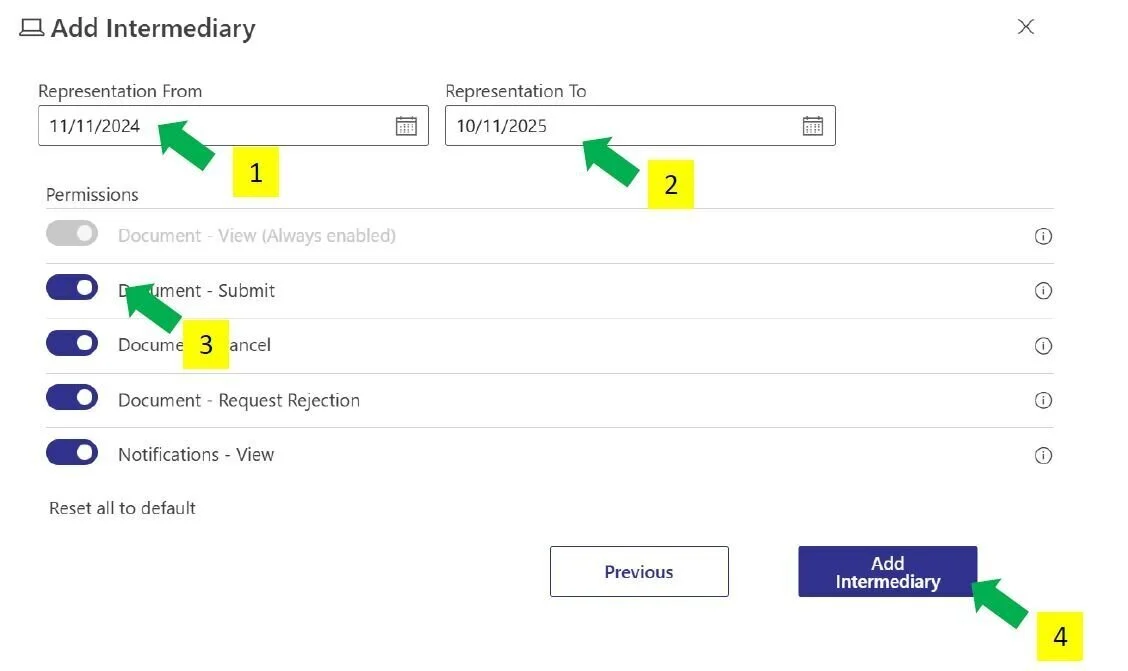
- Grant Phibonacci Creativo all permissions over the subscription period.
Recommended system requirements
Hornbill POS is a cloud-based software. In order to access the system, you must connect to the internet.
If there is a firewall implemented in between your device and the internet, the firewall must not block outgoing HTTPS connections.
The system is expected to run on most modern web browsers. For best compatibility, we recommend you to use the latest version of Google Chrome. The web browser must have Javascript enabled.
Access the system
Open the unique URI assigned to your company by Phibonacci Creativo.
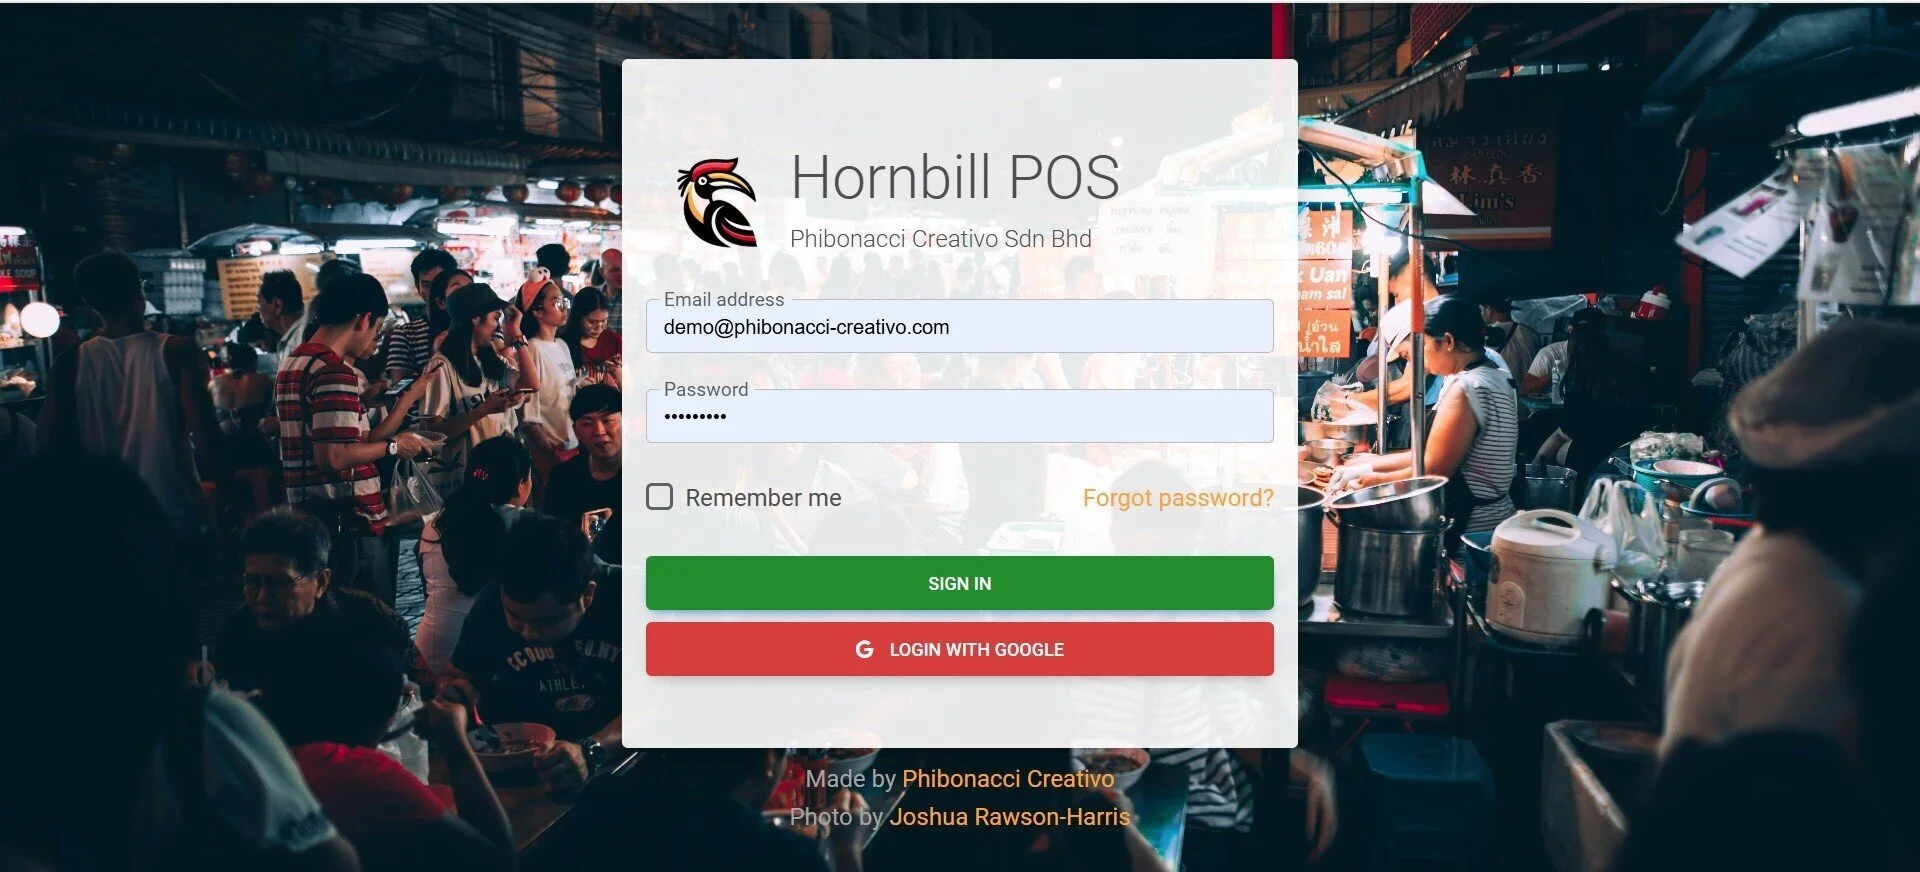
You will be redirected to the login page if you haven't logged in. You should also see your company name on the login page. This is to confirm you are accessing the system uniquely assigned to your company.
Installation
Hornbill POS is a Progressive Web Application (PWA) that can be installed on various operating systems, including Windows, macOS, Android, and iOS.
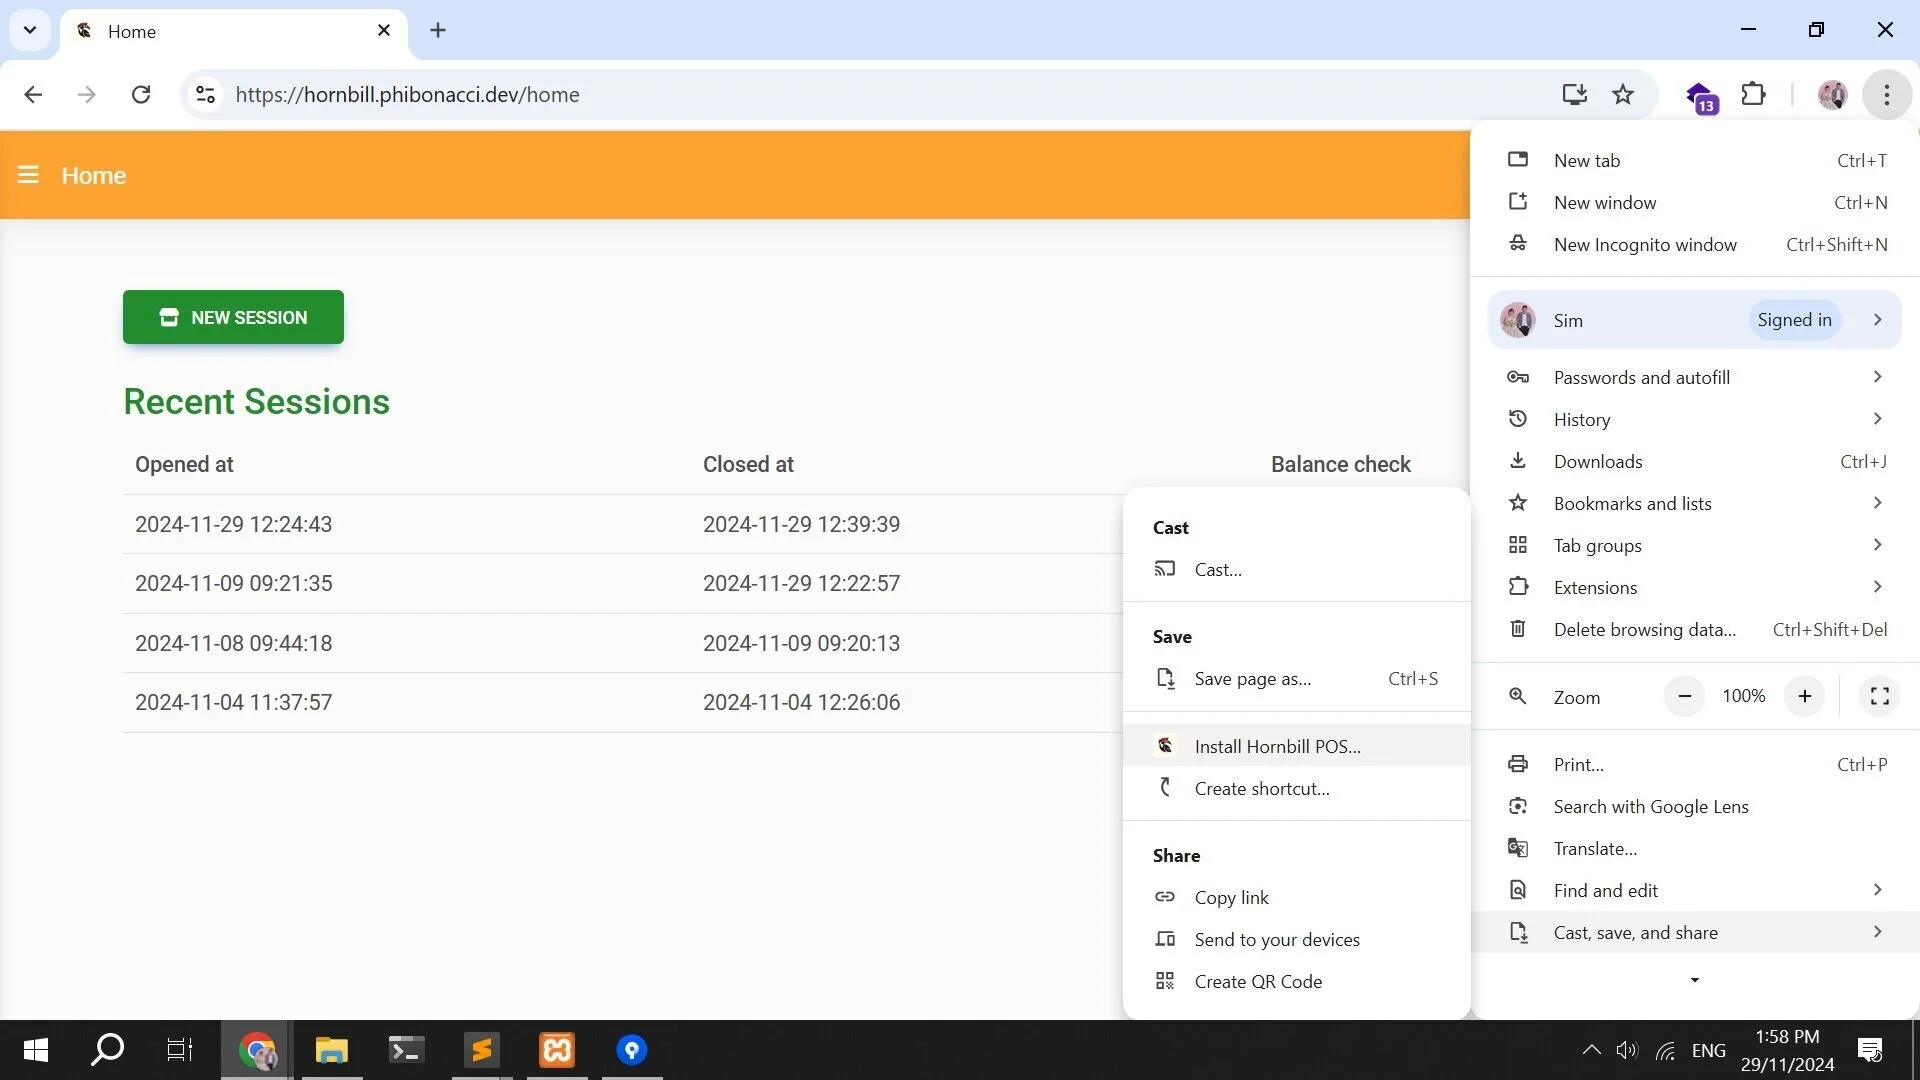
- Open the unique URI assigned to you by Phibonacci Creativo using Google Chrome.
- Open the Main Menu.
- Open the "Cast, share, and save" menu.
- Click "Install Hornbill POS."
The steps may vary slightly between platforms, but the general process remains the same.
First-time login
Before you can log in, you must have a user account assigned to you by your administrator. The system will randomly generate a strong password for the account without made known to anyone, including your company administrator.
You must reset your password before you can use the system for the first time. Alternatively, if your email is a registered Google Account, you may log in with Google Account.
Reset password
You must have access to the email inbox associated with the user account to reset the password.
- Click "Forgot password?" link on the login page.
- Enter the email address assigned to you and click "Reset Password" button.
- Check your email inbox. Please whitelist the email from hornbill@notifications.phibonacci.cloud. You should receive an email from hornbill@notifications.phibonacci.cloud with the subject "Reset Password" within a few minutes. If you don't see the email in your inbox as expected, check your junk folder.
- Click "Reset Password" button in the email. You will be redirected to the password reset page. For security reason, the password reset link will only be valid for single use within 60 minutes. Please repeat from step 1 if the password reset link expired.
- On the password reset page, enter your email address and password. You must use a complex password. If possible, don’t use any passwords used on other systems, software or websites.
- The system will automatically log you in and redirect you to the home page of the system after you have successfully reset the password.
If you experience any difficulties resetting the password, kindly contact our Technical Support for assistance.
Login
Open the unique URI assigned to your company by Phibonacci Creativo. You will be redirected to the home page of the system if you are already logged in.
You must enter the correct email address and password to log in. The system will temporarily lock your device if you enter wrong credentials for too many times in a short period of time. Alternatively, if your email is a registered Google Account, you may log in with Google Account.
You may access the system from multiple devices at the same time. However, it is not advisable to leave your devices unattended.
Multiple users can use the system at the same time.
If you forgot your password, refer to "Reset password" for instructions to reset your password.
User interface
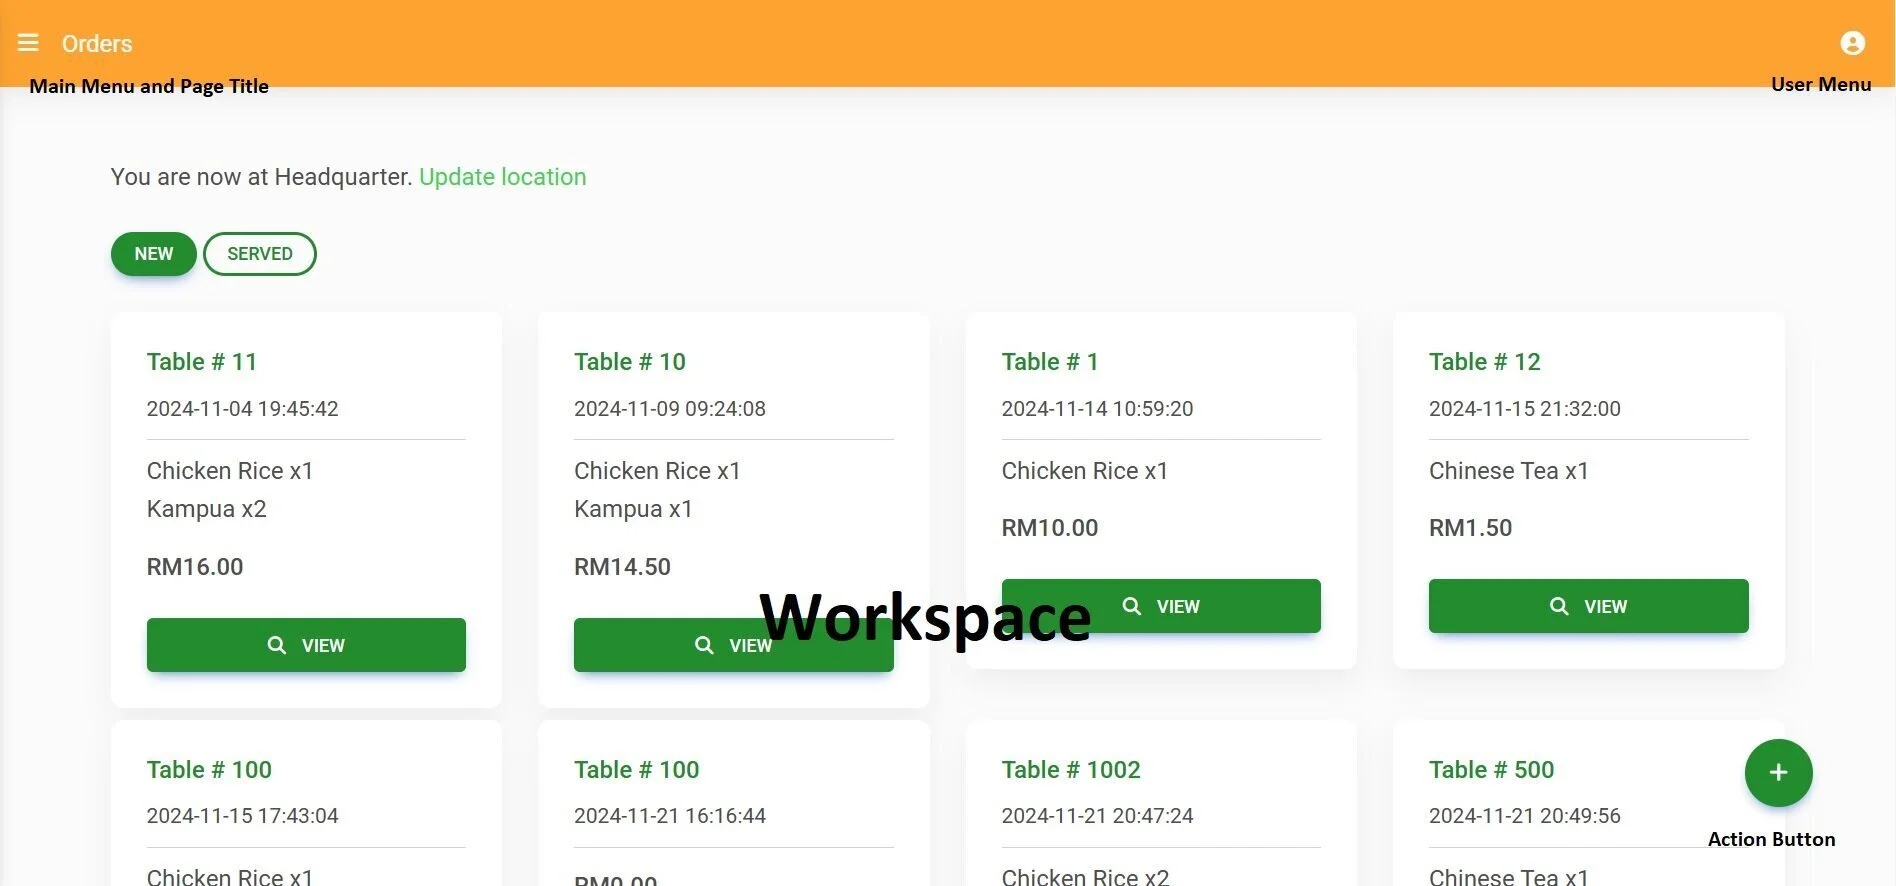
Hornbill POS is designed to be responsive to different screen sizes. Main components include Main Menu, Page Title, User Menu, Workspace, and Action Button.
Depend on the user role assigned to you by your company administrator, some features may not be made available to you.
Datatable is used to present large data sets. You can sort and filter data in the DataTable for quick data extraction.
Logout
The system will automatically log you out after 12 hours of idle. However, we recommend you to log out of the system immediately after you finish your work.
- Click "Logout" button on User Menu to log out of the system. You will be redirected to the login page after successful logout.
Change password and edit profile
Although the system has no password expiration policy implemented, we recommend you to change your password regularly to prevent possible unauthorized access due to the password leakage.
- Click "My profile" on the User Menu. This will redirect you to the profile page.
- Update your password as necessary.
You must use a complex password. If possible, don’t use any passwords used on other systems, software or websites.
System administration
You must be a Administrator in order to perform the initial setup and other administrative tasks.
Set up locations
If your company has multiple branches, you can set up locations to ensure that orders from different branches are not mixed up. This feature requires an additional branch license subscription. If you haven't subscribed yet, please contact our sales team or an authorized partner to purchase the additional subscription.
- Click " Administration" on the Main Menu. A sub-menu will be expanded.
- Click "Locations."
- Click the Action Button to add new location.
- Enter the location name.
- If you need to edit/delete a location, click the next to the location you want to edit.
Set up payment methods
The system uses payment method information to verify the counter sessions' balances and segment sales reports.
- Click " Administration" on the Main Menu. A sub-menu will be expanded.
- Click "Payment Methods."
- Click the Action Button to add new payment method.
- Enter the payment method name.
- If you need to edit/delete a payment method, click the next to the payment method you want to edit.
Set up product categories
If you have many products, you can use product categories to categorize them.
- Click " Administration" on the Main Menu. A sub-menu will be expanded.
- Click "Product Categories."
- Click the Action Button to add new product category.
- Enter the product category name.
- If you need to edit/delete a product category, click the next to the product category you want to edit.
Set up products
- Click " Administration" on the Main Menu. A sub-menu will be expanded.
- Click "Products."
- Click the Action Button to add new product.
- Enter the product name and price.
- If you want, you may also select product category, add variations, and add add-ons for the products.
- If you need to edit/delete a product, click the next to the product you want to edit.
Changes to product information will not impact existing orders or invoices.
Manage users
Hornbill POS is a multi-user system that allows multiple users to work simultaneously. Orders and invoices are tagged with the information of the last user who made updates. Therefore, each user should have their own account in the system.
The system categorizes users into two roles: Administrator and Staff. Administrators can perform all tasks and access all reports within the system. Staff, however, are limited to daily operational tasks and are restricted from performing administrative tasks or viewing reports.
- Click " Administration" on the Main Menu. A sub-menu will be expanded.
- Click "Users."
- Click the Action Button to add new user.
- Enter the user name and email.
- Select the role and location
- If you need to edit/delete an user, click the next to the user you want to edit.
Consolidate invoices
Taxpayers are required by law to consolidate all invoices issued to the general public each month. Our system allows the Administrator to easily consolidate and submit the previous month's invoices to the LHDN with a single click.
- Click " Administration" on the Main Menu. A sub-menu will be expanded.
- Click "Consolidated Invoices."
- Click the Action Button "Consolidate Invoice" to consolidate last month's invoices.
- If you need to view an consolidated invoice, click the next to the invoice you want to view. This will redirect you to the LHDN MyInvois portal.
Setup printers (optional)
Hornbill POS is designed to operate paperless, promoting cost savings, environmental sustainability, and enhanced efficiency. E-Receipts are seamlessly shared with customers via QR codes, eliminating the need for paper. For operational transparency, Kanban are utilized to display customer orders and track progress directly in the kitchen or at the wash bay. However, if occasional printing of receipts or order slips is required, the system supports this functionality by connecting to printers recognized by your device's operating system.
For Windows Users:
- Connect your printer to the computer using a USB cable or via your local network (Wi-Fi/Ethernet). Ensure the printer is powered on and properly installed on your system.
- Download and install the latest driver for your printer from the manufacturer’s website.
- Open the Control Panel > Devices and Printers. Right-click your printer, select Printing Preferences, and ensure paper size matches your receipt size.
For Android Users:
- Download your printer's official app (e.g., Epson TM Print Assistant, Zebra Print) from the Google Play Store.
- Connect your printer to your phone via Wi-Fi or Bluetooth. Follow the instructions provided by the printer manufacturer to pair the device.
- In the printer app, choose the receipt size you want to use.
For iOS Users:
- Ensure your printer supports AirPrint. Connect the printer to the same Wi-Fi network as your iOS device.
- Open Hornbill POS, and print the order slip / receipt.
- When the print dialog appears, select the printer and ensure the paper size matches your receipt.
- Test-print a receipt to ensure the layout fits the paper size.
If the printer does not appear in the list, verify the connection and ensure the printer is powered on. For mobile users, check that the printer app or AirPrint is installed and correctly configured.
Contact your printer manufacturer’s support for additional help with driver or app installation.
Daily operation
Open & close counter
In Hornbill POS, each user has their own dedicated counter, separate from others. When a user opens or closes a counter session and issues invoices during the session, the system automatically sums up the collection, cash in, and cash out, and performs a balance check for the user's counter session.
- Click " New Session" on the Home Page.
- Enter the starting balance for each payment methods.
- Click " Cash In" or " Cash Out" on the Home Page when there are such events.
- Click "Close Session" on the Home Page when you are done with your work.
- Enter the closing balance for each payment methods.
- If you need to edit a specific cash log event, click the next to the event you want to edit.
Take an order
- Click " Orders" on the Main Menu. Orders are filtered by location and status: New, Kanban, Served. New orders are those that have not yet been served. Kanban displays customer orders and work progress, with items served struck out from the order slip. This allows Kanban to function as an interactive mini Kitchen/Washbay Display System. You can adjust the filter at the top of the workspace.
- Click the Action Button to add new order.
- Enter the customer name.
- Select the item and click "Next ." If you have many items, you can use the search or category filters to simplify the selection process.
- Enter the details, including variations, add-ons, additional charges, notes, and quantities, then click " Add to order."
- Repeat from step 4 to add additional items to the order.
- Click the " Check" to check the order, bill the order, mark the order as served, cancel the order, print the order, or edit/delete existing items. You cannot edit/cancel the order after an invoice issued for the order.
Bill an order
- Click " Invoices" on the Main Menu.
- Click the Action Button to add new invoice.
- Select the order and click " Bill."
- Enter the discount, tender amount, payment method and references, then click " Save."
- Show the E-Receipt QR-code displayed on the screen to the customers. Customers can save the invoice, and request e-invoice by scanning the QR code. Optionally, you can print the invoice too.
- You may also void the invoice if it contain errors. You cannot void the invoice if an e-invoice / consolidated e-invoice had been issued.
Input sales summaries from other systems
You can also input sales summaries from cash registers or other POS systems for reporting and consolidated e-invoice submissions.
- Click " Receipt Rolls" on the Main Menu.
- Click the Action Button to add new receipt rolls.
- Enter the date, receipt numbers, total amount, then click " Save."
- If you need to edit/delete a receipt roll, click the next to the receipt roll you want to edit. You cannot edit/delete the receipt roll after a consolidated e-invoice issued for the roll.
Dashboard & reporting
The dashboard and reports provide real-time insights into your company business, helping Administrators manage F&B operations more effectively by analyzing the latest trends. However, they are not intended for analyzing large data sets. If the system responds slowly when viewing reports, please contact us for alternative solutions.
Dashboard
The Dashboard is the landing page after you logged in the system. It provides an at-a-glance view of Sessions relevant to you.
Sales report
Sales Report shows the latest daily sales total and trend.
Technical Support
Hornbill POS includes essential 8x5 technical support via email, chat, phone, and remote assistance. These services can be accessed using the methods listed below. Additional support options, such as 24x7 coverage, carry-in services, and on-site support, are available for an additional fee.
8x5 Support Hours
Monday to Friday (excluding public holidays), 9:00 AM to 5:00 PM
Contact Methods:
- Email: help@phiboacci-creativo.com
- Facebook Chat: https://www.facebook.com/hornbill.software
- WhatsApp Chat: https://wa.me/60175251618
- Phone: +60175251618